Microservices are the next big thing. they are understood as one of the foundations of a cloud-native solution, since they allow for faster development, technology abstraction and ease of deployment. In this article, we will look into how to write a microservice, package it and deploy it onto a Kubernetes cluster – but before doing this, we should make ourselves understand, what microservices are and in which way they differ from traditional approaches to software development.
What is a microservice?
First of all: A microservice is still a program. But, to earn this name, a microservice needs to comply to some principles:
A microservice is a functional domain
This principle is the most important one, since it depicts a change in how to think of components of an application. Traditionally, applications are divided into technical components – and switching to a microservices world therefore appears to be straight-forward: Just wrap the technical components (such as a database layer) into microservices, and off you go. But this approach is misleading, since it does not help in deployment- or update-scenarios, since the technical layer is usually used by multiple other services, thus creating a strong dependency between them.
The better – and recommended – approach to microservices is to create functional domains. This means, a microservice handles one functional task, such as the management of a booklist, completely end-to-end: It exposes a RESTful API, it stores, retrieves, manipulates and returns the data. No other service in a microservices application will be implementing this functionality, all services relying on this functionality will utilize this specific microservice.
Writing a microservice this way, it could scale better and is independent from other functional services, the dependency from other services is a functional one, not a technical. Whenever functionality changes, only this specific kind of service needs to be redeployed, leaving all other services untouched.
A microservice is exposed via a webserver
Usually, a microservice is deployed in a Webserver as Ap- plication. It listens to a specific port (most often 8080 or 8000), it either renders a webpage or exposes a RESTful Service API.
Since HTTP or HTTPS is used as communication technology, microservices are better abstracted from each other. They communicate over the network, no direct memory-access between components is possible. This allows for a greater variety of technologies used within a micro- service-based application, since the common denominator will be the network-protocol, not the programming language being used. Scenarios, where NodeJS-based services for simple workloads, Java-based services for a deep integration with middleware and Microsoft-R-based services for statistical computations run side-by-side, are not unrealistic and allow for a “Best-tool-for-the-Job”-approach, since all these services would have to have in common, will be a RESTful-API being exposed to each other.
The key to this, is to write a microservices-based application in a way it can be packaged inside a Webserver.
A microservice needs to be self-contained
A microservice is bundled in one package. There must no external server needed to run the service. The term “package” is a bit misleading, though, since it might imply the service to package all in itself. Instead, “package” refers to a deployment package, which needs to be self-contained. Typically, microservices are packaged as container images. Therefore, a self-contained microservice package refers to a webserver being part of the container image, with the service being deployed as application inside the webserver. There is no specific technology required for this – any modern webserver being able to run the microservice is suitable.
The only hard constrain is related to the packaging: A microservice needs to be packaged into one deployable and completely self-contained unit. All dependencies need to be part of the package, no external dependencies are allowed. If the service depends on external configuration information, this information needs to be retrieved at runtime by reading environmental variables or config maps.
The main idea is to have a service which just needs to be deployed and started.
A microservice needs to be small enough
The size of a microservice is always something to discuss upon: To some, it needs to be as small as possible, others tend to write something like „makroservices“. The truth lies inbetween the two extremes: A microservice needs to have a reasonable size, it should contain all functional logic, should be maintainable by a small team and should have a small overall footprint.
If you are not satisfied with the size of a microservice, you can always split it into two or more smaller services. This is usually easy to accomplish, as all requests to the service are executed using the HTTP-protocol and there- fore can be proxied to one of the smaller services, allowing other services to utilize the functionality without knowing anything of the actual structure of the called component. If you run the services within a Kubernetes environment, you have additional capabilities of rerouting requests without having to change a single line of code in the calling components and without having to write a proxy yourself – the open-source service-mesh ISTIO [1] is a viable component to consider.
Writing a simple microservice
As mentioned above, a microservice can be written in any programming language which allows to be deployed on and to be accessed via a webserver. Typically, it is done using Java, Go or NodeJS, since these programming languages either have a long-lasting tradition within enterprises (Java) or are easy to learn and very efficient (Node- JS, Go). To simplify packaging, programming languages should be preferred that allow to run completely self-contained, meaning: They should be able to start a webserver and expose the application via this server, avoiding the need to download and maintain an external server by hand. For this simple example (Example 1), we choose Java with Spring Boot for creating a simple microservice which exposes a single REST-endpoint [2]:
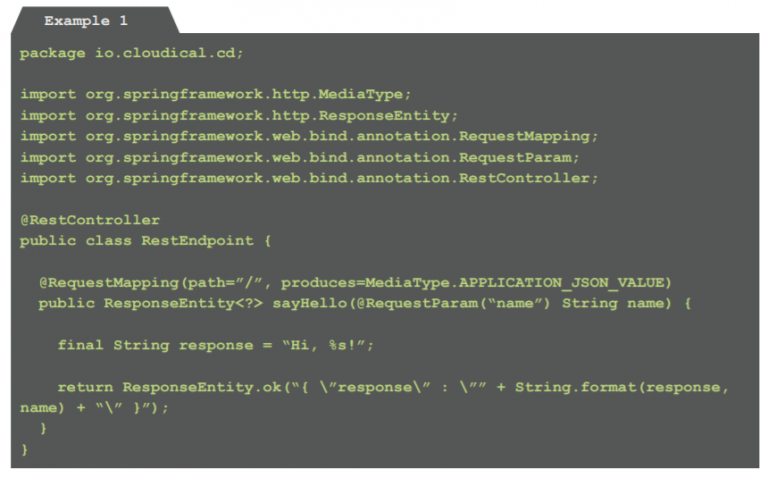
Example 1: Code for exposing a simple REST-endpoint (RestEndpoint.java)
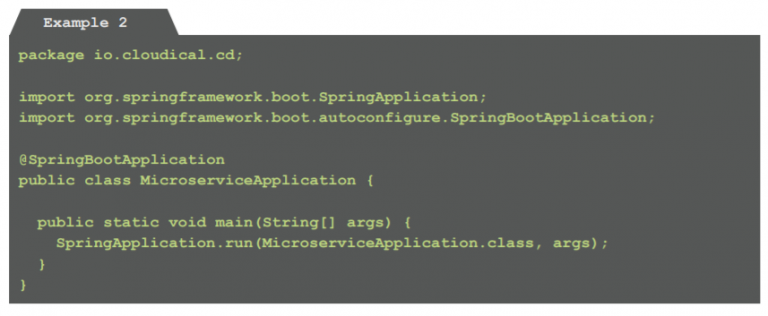
Example 2: Code to start the microservice-application within a Spring Boot provided webserver (Microservice Application.java)
This code is able to run locally on a developer’s machine for testing purposes, for any other purpose it needs to be packaged into a container image.
Packaging the microservice
For packaging a microservice, containers have evolved to be the tool of choice. They abstract the microservice from any environment, providing a well-known infrastructure from the services point of view. Since a container is self-contained, it is simple to run from a orchestrator’s perspective – usually, the process is as simple as pulling it from a registry, starting and later on stopping it.
There are several container engines available for Kubernetes, with Docker being the most widely used one. Creating a Docker container is very straightforward: The container is described using a Dockerfile and then the image is built and tagged using Docker’s build command. Finally, it is uploaded and therefore stored in a repository, where it can be retrieved by an orchestrator later on based on the tag it was given during the build-process.
This is executed only once, since it is always the same image to be deployed to any environment. Only parameters and configurations differ, the image being used is al- ways the same.
For a Java-based microservice, a Dockerfile might look like this:

Example 3: Dockerfile for creating a deployable image (Dockerfile)
The Docker build command needs to be run to create the image. It is advised to do the tagging during this stage as well (fig. 1):
docker build -t cloudicalio/simpleservice: latest.
Once the image has been built and tagged, it needs to be pushed to a registry:
docker push cloudicalio/simpleservice: latest
Now, the service is made available for deployment.
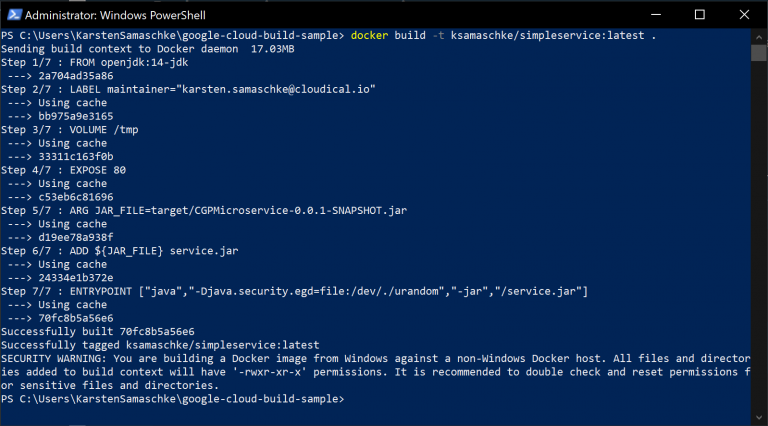
Fig. 1: Building and tagging a Container image
Deploying a microservice
Having Kubernetes in place, a microservice stored in a container registry can be deployed on the environment and made available to the public using YAML-files.
First, let’s have a look at the deployment for the service:
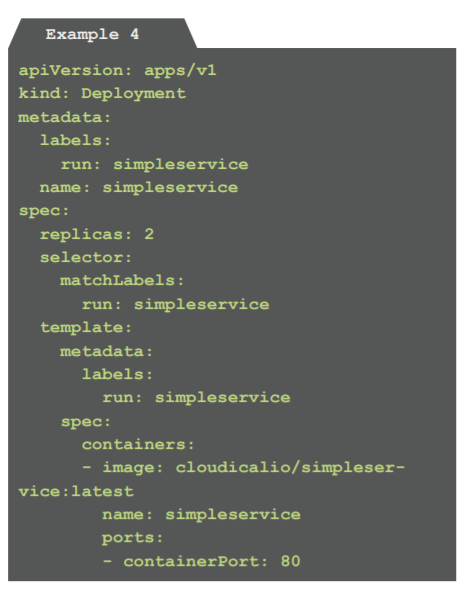
Example 4: A deployment script for running the microservice in two instances (deployment.yaml)
This script defines the container image named cloudicalio/simpleservice:latest to be deployed to Kubernetes. Using the replica-tag, it is defined to run in two instances. The deployment (called a “pod” in a Kubernetes context) will be named simpleservice and has the label run: simple- service attached to it. The label is very handy to identify the pod for making it available to the public.
To actually deploy the service, the YAML-file needs to be transferred to the Kubernetes cluster. The kubectl-com- mand line interface is used for this:
kubectl apply -f deployment.yaml
Within some seconds, the deployment will be transferred to the cluster and made available (fig. 2).

Fig. 2: Checking for a deployed Pod
Unfortunately, the service is not accessible to the public yet – a service definition needs to be established, allowing the microservice to be exposed:
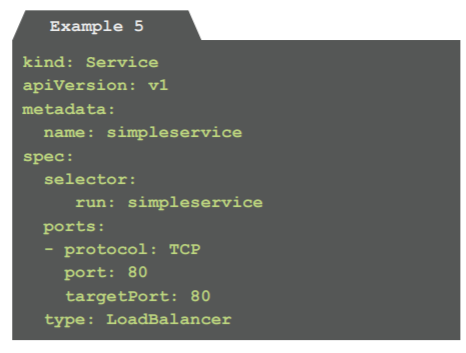
Example 5: A service exposing the microservice to the world (service.yaml)
Kubernetes provides different kinds of services for ex- posing a deployment. In this scenario, we created a service of type LoadBalancer, which is exposed on the cluster and is assigned an external IP-address. Whenever a request hits the IP-address, an instance of a pod labelled with run: simpleservice (as defined above) is invoked and is required to handle the request. The Load-Balancer listens to the HTTP-port 80, the pod being involved – or more specifical– ly: The microservice in the pod – is expected to listen on this port as well.
The file needs to be transferred onto the Kubernetes cluster similarly to the previous one:
kubectl apply -f service.yaml
After a few seconds, the service can be accessed and used (fig. 3):
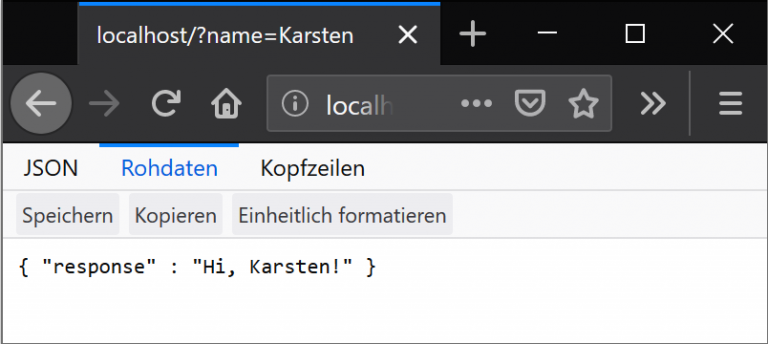
Fig. 3: The service can be accessed using any web browser
Don’t do it this way!
It is very easy and straightforward to write and deploy a microservice, isn’t it?
To be open: When you do it the way it has been shown to you in this article and in many tutorials, you will run into a lot of problems, since it is one of the worst approaches to writing and deploying microservices. The reason for this: There is no automation in place and the process is very error-prone doing it this way.
The next step – after having it done exactly once this way for learning purposes – needs to be the establishment of a CI/CD-pipeline, which will handle build, tagging, upload and deployment for you. An approach to this will be shown in the next issue of this magazine.
Sources:
– 1. ISTIO-framework: https://www.istio.io
– 2. Sources for this project: https://github.com/cloudical-io/simpleservice-sample

Karsten Samaschke
CEO ofCloudical
karsten.samaschke@cloudical.io
cloudical.io / cloudexcellence.io